Ever had the joy of a freshly made bagel? It’s pretty close to heaven in our book!
The bagel is starting to make a break through in Australia although it’s still definitely not mainstream. You’ll sometimes find a stunning bagel at a local growers market or you can find a poor excuse for a bagel in the supermarket. The mass produced, barely loved bagel you’ll find in the supermarket really shouldn’t be called a bagel though. Just unloved bread in a donut shape!
To us a bagel is all about the love that goes into it’s creation. The bagel isn’t difficult to make and doesn’t even take that long. It just requires a little time and a small amount of fiddling.
Once you master the art of bagel baking, it might even become a tradition!
The History of the Bagel
If you’d asked us, we would have said that the bagel began life in the bakeries of New York. After all the ultimate bagel is the New York style bagel right?
According to the Smithsonian Magazine, bagels are mentioned in written records from Krakow as early as 1610, and a similar-looking Polish bread called obwarzanek dates back to 1394. Ring-shaped breads have a long history in other countries, too: Italy has taralli and ciambelle, and China has girde.
They did end up in New York eventually. Bagels arrived with the Eastern European immigrants of the late 19th-century, but didn’t emerge from their mostly Jewish niche markets into the mainstream until the 1970s. They are hugely popular in the US these days – with entire stores devoted to the bagel.
How do you eat a Bagel?
The way you eat your bagel depends mostly on your personal taste.
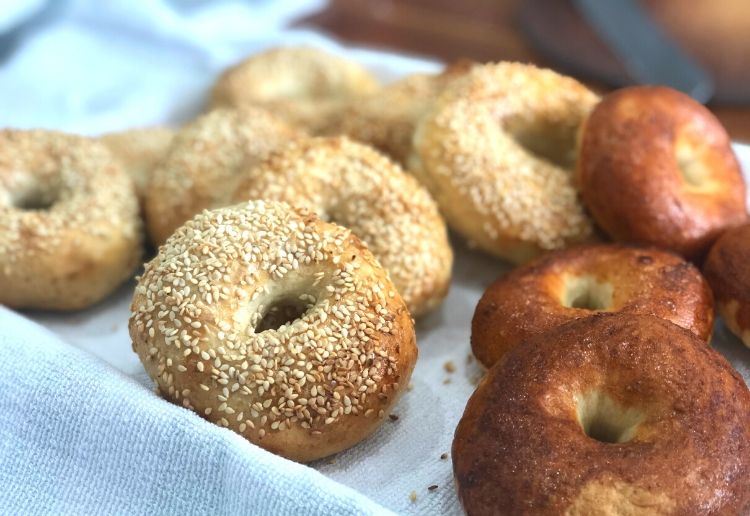
If you prefer a savoury flavour, go for a plain bagel or one that is coated in sesame seeds or a seed mixture then smother with a cream cheese spread that includes smoked salmon, finely sliced red onion, white pepper and capers. If you prefer a vegetarian option, you might like to mix finely chopped anitpasto veges (e.g. olives, semi dried tomatoes) and some fresh herbs together with a pinch of salt and ground pepper.
If your tooth says sweet, you’ll love a Cinnamon or Blueberry bagel. A wonderful cream cheese combo is to add brown sugar, crushed walnuts and a little cinnamon. Or you might prefer straight cream cheese with a drizzle of honey or golden syrup.
Tradition says that even fresh out of the oven, the perfect bagel would be sliced through and toasted for a minute to two. However many prefer to eat their bagel untoasted. You can reheat in the microwave but be aware this will make it even more chewy.
Why so chewy?
Bagels are meant to be chewy – that’s why they’re different to bread. The good news about baking bagels at home is that you do have some control over how chewy your bagels are. When you get to the boiling part, simply add another 30 seconds on each side if you’d prefer a little more chew factor.
When it comes to the FLOUR for this recipe, not all flours are right. You must use a Bread Flour or a ‘strong’ flour so that your bagels hold their shape and can be worked well. We prefer Lighthouse Bread & Pizza Flour (not sponsored by the way). Available at major supermarkets.
We hope you enjoy this recipe. Once you get the hang of it, you can start to get a little creative with your own bagels. Throw in a handful of herbs, try wholegrain flour instead of white, try raspberries rather than blueberries or add some cheese before baking. The skies the limit – have fun and enjoy your bagel!
Ingredients (makes 8 Medium Bagels)
- 2 tsps Active Dry Yeast
- 2 tbsp Rice Malt Syrup (or you could use Brown or Raw Sugar)
- 300ml Warm Water (warm bath type warm - not too hot or you will kill the yeast)
- 500g Bread Flour (or High Protein Flour)
- 1 tsp Sea Salt
- 1 Egg White
- 1/2 tsp Bi-Carbonate Soda (optional)
Method
- If you have a benchtop mixer or food processor with a dough hook or bread kneading function, do everything for this recipe in the main bowl. If not make the yeast mixture in a jug, combine all the dry ingredients in a large bowl and then mix together.
- Add the yeast to the warm water. Do not stir. Let it sit for 5 minutes (for the yeast to activate).
- Drizzle in the rice malt syrup and add the dry ingredients. If using a dough hook/food processor, set to 'knead' and mix for 10 minutes. You are aiming for a moist and firm dough after you have kneaded so you may need to add a little more water or flour depending on the day.
- Dust your benchtop with flour and knead the dough for about 10 minutes until it is smooth, free of air bubbles and stretchy. Keep sprinkling with flour as you knead as you want a nice firm dough in the end.
- Lightly spray the inside of a large mixing bowl (metal if you have it) and sit the dough ball inside. Spray with a little olive oil, a piece of baking paper and then cover with a warm, damp clean tea towel or cloth and leave in a warm place to rise for about an hour. If it's a really cool day or you want to speed up the dough rising, you could sit the bowl inside another larger bowl and pour hot water in the outside bowl to create warmth.
- Flour your benchtop again and turn the dough out of the bowl. Punch it down again (to take out any excess air) then let sit for another 10 minutes.
- While your dough is rising, sort out what sprinkles you'd like to add to your bagels: Poppy Seeds or Sesame Seeds Flaxseeds + Sunflower Seeds + Chia Seeds Finely chopped almonds, walnuts or pecans Garlic or Chilli Flakes Dried Herbs and Spices
- Now is also a good time to start bringing a large pot of water to the boil. Add a pinch of salt and a 1/2 teaspoon bi-carbonate of soda.
- Now to shape your bagels: Divide the dough into 8 (for medium size bagels) or 12 if you'd like to make smaller bagels for the kids. Shape each chunk of dough into a smooth round ball. Place the ball onto a well floured spot on the bench and poke your finger into the middle of the ball. Start swirling your finger around so that the bagel swings around in a circular motion and the hole in the middle starts to become larger. You want to end up with a centre hole 2 - 3cm wide.
- Place each bagel onto a baking tray lined with baking paper and allow to sit for another 10 minutes. Gently cover them with a light damp cloth. Preheat your oven to 210 - 220 degrees celcius. Yes it seems hot but your bagels will thank you.
- Now to boil your bagels: Depending on the size of your bagels, you may be able to boil 2 or 3 at a time. Start with fewer until you figure out how much they will puff up. Drop the bagel into the boiling water. In 5 - 10 seconds your bagel should pop to the top (if it sunk when you first put it in). Once the bagel is on the top of the water boil for at least 1 minute then flip over and boil the other side for another minute. If you want a chewier bagel, boil each side for 1.5 - 2 minutes. That's the New York Style Bagel! Take a large slotted spoon and remove each bagel from the water and rest for a few seconds on paper towel or a clean tea towel to absorb excess moisture. Place bake onto the baking tray. The bagels won't continue to rise after this so they can be fairly close together.
- Once all the bagels are boiled, lightly brush with whisked egg white (not too much or it will drip down and you'll have egg white around the edges of your bagel). While the egg white is still wet, sprinkle with whatever toppings you are using. If you are going for plain bagels, leave as is.
- Place your tray in the centre of the oven and cook for 10 minutes. Rotate the tray and continue to cook for another 5 - 10 minutes until golden brown. They should feel quite tough on the outside - don't worry they will be lovely on the inside.
- Place on a wire rack to cool. Or if your family is anything like ours, they'll be hovering around waiting to grab them fresh out of the oven! The ultimate is to slice through and toast but some do prefer them just fresh.
Our bagel recipe freezes really well. A tip is to slice them through and slip in a small piece of baking paper before you freeze them so that when you want to eat them, you can simply pop them straight into the toaster without having to wait for them to defrost enough to cut through. Don't freeze them until they are completely cooled. We'd love to hear your thoughts on this recipe. It seems to be a lot of effort but once you've done it once, it's actually quite straightforward.







7:43 am
1:36 pm
6:24 am
4:58 am
-

-
-
Ellen replied
- 26 May 2024 , 7:57 am
Reply8:46 am
11:30 pm
9:29 pm
3:47 pm
10:16 am
3:52 pm
12:03 pm
8:52 am
8:10 pm
11:20 am
9:26 pm
3:02 pm
5:14 pm
8:24 am
6:51 am
7:02 pm
- 1
- 2
- …
- 5
- »
Post a commentTo post a review/comment please join us or login so we can allocate your points.