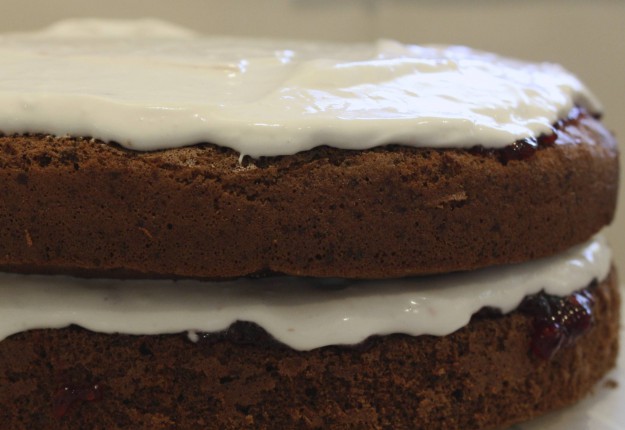
This Dairy Free Chocolate Sponge Cake is a great alternative to sponges based on dairy.
Ingredients (serves 8)
- 6 x large eggs
- 1/4 cup caster sugar
- 1/2 cup plain flour
- 1/3 cup arrowroot flour/starch
- 4 tbsp unsweetened cocoa powder
- 1 tsp baking powder
- 1 jar raspberry or berry jam.
- 400ml coconut cream full fat, refrigerated overnight (for whipped cream, see instructions)
- 1 tsp vanilla extract (for whipped cream, see instructions))
Method
- Pre-heat your oven to 160°C (fan forced) and grease two sponge pans. Place circles of baking paper on their bases and put aside.
- Sift the dry ingredients twice, as the third time you sift them will be into the eggs, put aside.
- Crack the eggs into a large mixing bowl and beat them on slow speed for one minute to combine, and then on medium speed for nine minutes until they have practically quadrupled in volume
- Beat in the caster sugar, a little at a time, making sure each is properly dissolved before adding the next.
- Sift the flour for the third time, in small batches, into the egg mix. It’s very important to make sure each addition is properly folded through or you will get lumps. Sift gently and slowly, making sure not to stir the air out of the mix.
- Pour the batter into the two tins. Be sure not to scrape the bowl too hard or too heavily, as this will cause the dregs to loose their air.
- Cook the sponge cakes for 10-12 minutes, or until they spring back from the edges of the pan and a skewer inserted into their centres comes out clean.
- Immediately tip them out onto a wire rack, covered in baking paper, to cool.
- If you want you cakes perfectly flat cut any parts from the top you see sticking up, otherwise smear the top of one cake with jam and coconut whipped cream (see the last instruction) and let that be the base. Place the next cake on top, with the flat bottom facing up . Cover this in a layer of jam and coconut whipped cream too.
- Refrigerate the cake in a cake carrier or a similar box, to prevent it from drying out and to allow the cream to harden.
- Serve.
- COCONUT WHIPPED CREAM: Chill the can of coconut cream overnight. Put a mixing bowl in the freezer to chill, and then drain the excess liquid from the can so that only the solidified coconut-y fat remains. Place the solidified fat into the mixing bowl and whip on medium/high speed until soft peaks form. Add the vanilla and whip again.
Notes
This recipe is also available on my blog: ineedafeed.wordpress.com









4:35 pm
8:47 pm
9:03 pm
4:34 pm
7:10 pm
6:39 pm
12:04 am
12:50 pm
12:53 pm
1:31 pm
3:55 pm
7:54 pm
12:13 pm
5:49 pm
9:41 pm
7:15 pm
7:46 am
8:14 pm
10:28 pm
7:44 pm
- 1
- 2
- …
- 5
- »
Post a commentTo post a review/comment please join us or login so we can allocate your points.