

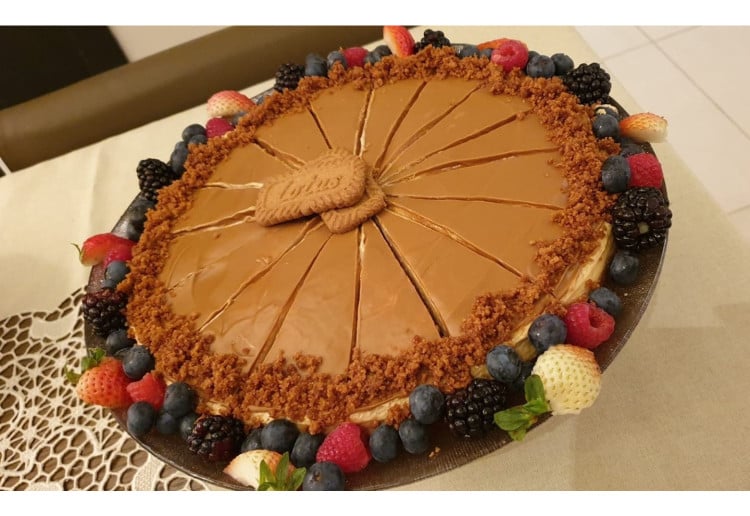
I took this cheesecake to a couple of recent gatherings and needless to say, it stole the show!
If I got a dollar for every time I’ve been asked to share a Lotus Biscoff cheesecake recipe, I’d be…well…not quite a millionaire, but maybe close to a hundredanaire.
Ingredients (serves 10)
- For the crust
- 30 / 235g Lotus Biscoff cookies
- 6 tablespoons (3oz/ 85g) unsalted butter, melted
- For filling
- 1 cup (237ml) heavy whipping cream, very cold
- 12 1/3oz (350g) cream cheese, at cool room temperature
- 1 cup (260g) Lotus Biscoff spread (aka Speculoos or any cookie butter)
- 2/3 cups (75g) powdered sugar salt
- 1/8 teaspoon salt
- 250g Cream cheese, I use Kiri Creamy, the one in the tub, not the squares.
- FOR THE TOPPING
- The remaining 140g (heaping 1/2 cup) of the Lotus Biscoff spread jar
Method
- Adjust oven rack to middle position and heat oven to 325F/160C. Line the bottom of a 9 or 10-inch springform pan with a parchment paper round.
- Begin by grinding up a full 250g packet (except 2) of those delectable Lotus cookies into fine crumbs. Off to a great start already! Then mix the crumbs up with melted butter. Set aside 1/4 cup (50g) of the crumb mixture to garnish the rim with later.
- Pack the rest of the crumb mixture into the bottom of a springform pan. Evenly spread the remaining crumb mixture to the prepared pan's bottom, then press with a flat-bottomed drinking glass or measuring cup. Now, if you want to stay true to the “NO BAKE” nature of the recipe, you can leave it as is and all will be good with the world, but I love to bake it for just about 8 minutes. This helps set the crust better and gives it a more aromatic flavor and crisper texture. Your call! Just be sure to let it cool completely before pouring in the filling.
- TO MAKE THE FILLING: Beat together the cream cheese, Lotus Biscoff spread, powdered sugar and little salt until nice and creamy. Then gently fold in some previously whipped cream to lighten it up.
- Plop and spread that yummy cheesecake filling into a smooth layer, trying with all your might, not to ditch the idea of making a cheesecake and eat it all up with a spoon. The filling should be thick and spreadable and not soupy at all. At which point, cover that deliciousness, bid it farewell and refrigerate until set; about six-ish hours, even better overnight.
- To ensure a sturdy cake that won’t wimp on you as you add the warm topping, I like to pop the cheesecake in the freezer for about 30 minutes before unmolding it from the pan. After that, transfer it to your serving platter, then microwave whatever’s left of the Lotus jar until melted.
- Refrigerate the cake once more, to set the topping, then remember that 1/4 cup of crumb mixture that we’ve set aside? Now’s the time to pull it out! Sprinkle it all around the rim.
- To get those perfectly cut slices, simply dip a sharp knife in hot water, wipe it dry, the slice. Repeat, wiping the knife clean between each slice. Serve cold…straight for the fridge.


8:36 pm
11:54 am
8:27 am
10:40 pm
4:25 pm
12:43 am
4:16 pm
10:29 am
12:00 am
9:47 pm
8:43 pm
8:38 pm
10:41 pm
9:09 pm
8:35 am
4:53 pm
10:29 pm
11:16 am
8:51 am
10:49 am
- 1
- 2
- 3
- »
Post a commentTo post a review/comment please join us or login so we can allocate your points.