
By: Nikki Hills, Mouths Of Mums Founder
I am into high impact, low effort ideas! Those of you that have been following Mouths of Mums for a while will know that I’m always rushing and never really leave enough time for anything. So the order of the day for me is always tricky little ideas that will have my children oohing and ahhing with glee that can be achieved with a minimum of fuss.
Yes, I know some of you will say that this is far more effort than you’d want to put into a birthday cake – especially when it’s going to be devoured by little monkeys (or squashed into the floor) faster than you can say “Quick, where’s the camera”. But this year’s party was at an indoor play centre “Lollipops” and ALL I had to do was the cake. So, the night before we made a start on our little joint project.

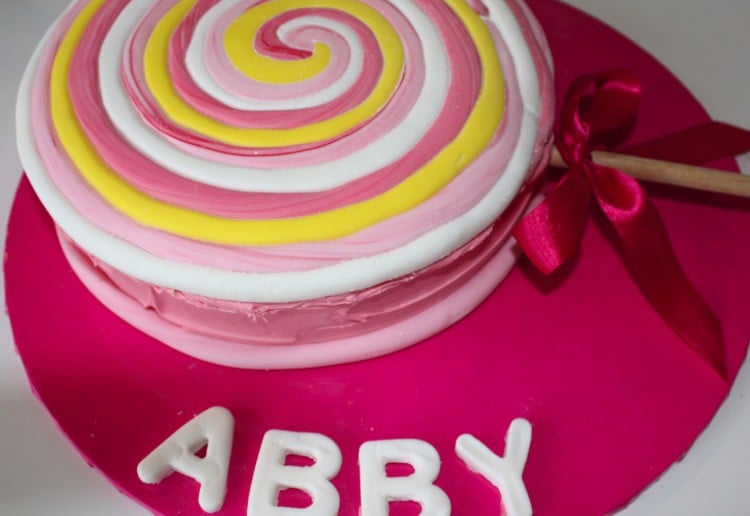
The Cake
For this cake, we bought two White Wings Heavenly White Mud Cake cake mixes, combined them into one large cake tin and cooked until nicely done. MoM Tip: When I combine two lots of mixture, it always takes longer to cook through. So that the outside of the cake doesn’t dry out too much I do two things – turn the oven down a little (if it says 180, I cook at 165) and I also put a tray of water on the bottom rack of the oven which just keeps the inside of the oven moist and therefore helps the cake stay nice and moist. So together the big batch took just over an hour to cook. If you end up undercooking the cake and it sinks slightly in the middle, don’t worry! You can always add some extra icing later (the kids won’t mind a bit)!
The other main requirement for this cake is Queen Ready To Roll White Icing – we used 2 full packs of this for our Lollipop cake. By the way, both the cake mix and the icing are available in either Woolies or Coles.

The Icing
While the cake was cooking, we softened the white icing for a few seconds in the microwave. We created 4 even chunks of icing and set 3 aside well sealed in ziplock bags. With one chunk, knead until nice and smooth and then roll out to about 3mm thick. We used some alphabet letters (from a Playdoh set) to cut out the birthday girl’s name. We then lightly sprinkled the letters with icing sugar and set aside until we were ready to assemble in the morning.
The night before the party, we also created our coloured batches of icing. We like to use the concentrated food colour gels made by Queen which is available from most supermarkets. Go slowly with these colours as you’ll get a highly concentrated colour with the smallest dab of colour. Use a toothpick or the tip of a fork to apply the colour and watch out for the colour as you’re kneading – you’ll have pink hands for days! We chose dark pink, light pink and bright yellow. You’ll see from the close up, we decided to leave some of our colour not quite fully kneaded in (the kids thought it looked more like a lollipop).

That’s it for the night before. Seal up each batch of coloured icing into ziplock bags or wrap really tightly in cling wrap – it’s super important it stays totally airtight. Take your cake out of the oven and allow it to cool all night on a wire rack.
Putting It All Together
Next morning, I placed the cake onto a cake board that I had covered in pink wrapping paper and then added a layer of clear contact (not necessary but I’m reusing the same pink board in a couple of weeks for a friend). We then cheated and added some pink colouring to a tub of Betty Crocker Vanilla Frosting. This is the most delicious frosting but if you wanted to, you could use a home made butter icing with exactly the same effect. I then completely covered the entire cake with the pink icing.
Set the cake aside and keep all the little fingers in your house away from the sides of the cake! I then set about making the lollipop swirl for the top of the cake. Basically you want to make a set of long ‘snakes’ in each of the colours. Just guess roughly but if you can get your snake to about 80cm long and work on each snake being the thickness of your little finger, this should see you through. Experiment a little getting the swirl started – you might want to slighly offset each snake to get the middle right. Just pretend it’s playdoh and have a bit of a fiddle. Once you get the centre right, it will be super easy to create the large swirl.

It’s important when you’re working with this icing that it doesn’t stick to the bench so ensure you either work on baking paper or keep the bench well dusted with pure icing sugar. Don’t worry if it makes your swirl look all powdery – this is really easy to brush off with a pastry brush (or a big clean make up brush) once you’re finished.
Before you start your swirl measure across your cake so that you know how big your swirl needs to be finished. Ours was 22cm across so as we created the swirl, I measured a couple of times to get it right.
Once you’re happy with your swirl, break off the ends and use your fingers to smooth each of the ends down. Press lightly around the edges of the swirl to slightly push it together. The next bit is a little tricky but if you take your time, you should be fine.
To transfer the swirl onto the top of the cake, I slid my swirl off the bench and onto a thin, flat cutting board. From here, it was relatively easy to then slide that onto the top of the cake. Try and position it correctly from the start but once it’s on you will be able to reposition slightly because the icing is a little bit slidey! If you find an edge ‘slips’, use a toothpick to hold it in place (just remember to take it out before you serve the cake)!

I always like to finish the bottom of the cake (where it meets the board) neatly. This time, we made another ‘snake’ and then just lay this onto the board around the bottom of the cake.
After that, all you need to add is a lollipop stick – we had some timber dowel in the shed to which we added a pink ribbon. You could also use the fat end of a chopstick or the handle of a wooden spoon. Just judge the length so that it looks in proportion to the lollipop. All you need to do is jab it into the cake about 10 – 15cm so it stays put.
Then all you need are your candles … and this year we added a sparkler – just for fun!

Oh, and if you wanted to continue the theme, you could always give each child a lovely lollipop – instead of a party bag! A little more sugar … just what every mum wants!! What’s your favourite birthday party trick?


8:59 am
3:59 pm
8:05 am
12:45 pm
4:55 pm
11:03 pm
4:11 pm
1:45 pm
11:15 am
6:40 pm
5:24 am
11:40 am
3:28 pm
1:41 pm
9:29 am
9:30 pm
11:22 pm
3:10 pm
3:20 am
3:21 pm
- «
- 1
- 2
- 3
- 4
- …
- 9
- »
Post a commentTo post a review/comment please join us or login so we can allocate your points.