150 Comment
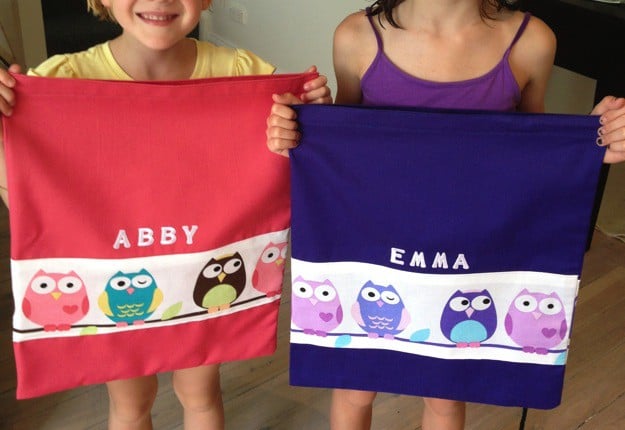
Now you know how to make personalised book bags, you can call your self SUPER-MUM! a great thing to do with the kids in the holidays that they can show off at school!
Material
- 2 pieces of coloured fabric
- 1 set transferable iron on letters
- 1 strip of patterned fabric (I used owls)
- 1 needle and thread / sewing machine
- 1 scissors
- 1 iron
- 2 Draw strings
Method
- First cut out a rectangle of fabric (when folded in half this will need to be the size you would like your bag to be.
- Lay out the fabric good side up and stitch/ glue on your band of patterned / designed cloth decoration along the bottom of the longer edge.
- Before you stitch up into a bag stitch in your draw strings along to the other long edge. TIP : Make sure you tie loops or knots at the end of the draw strings so they don't get pulled out!
- Now fold your rectangle in half to form a square (I fold it so the patterned fabric is facing in so i can turn it the right way round once stitched)
- stitch along the bottom edge (by the patterned strip) and up the side edge to just below the draw string.
- Turn the right way round
- Iron on your kids names where you want them on the bag and your done!
Want other brilliant projects sent to you?
You might also like…
This project was posted by:









12:43 pm
10:04 am
5:32 am
5:04 pm
1:37 pm
9:27 am
8:25 am
8:35 pm
8:19 pm
4:05 pm
2:28 pm
8:12 am
3:03 pm
8:52 am
5:39 pm
1:40 pm
5:10 pm
3:57 pm
2:45 pm
8:26 am
- 1
- 2
- …
- 8
- »
Post a commentTo post a review/comment please join us or login so we can allocate your points.