


55 Comment
A *genuinely* fast and easy DIY project to use up that old Tallboy or chest of drawers, and make that ‘dead space’ (that many of us have in the bottom of our pantry cupboard) a viable and functioning component of your kitchen 🙂
Material
- 1 Old Tallboy Chest of drawers
- 1 Set of 4 Castor Wheels
- 1 Power Box on 2m lead (or 2 outlet power board on long cord)
- Approx 5 Nail in Cable Clips
- 1 Large Cup Hook
Method
- Decide how tall you want the finished trolley to be by measuring your space (where you're going to keep the trolley) and then deducting the height of the castors, and the largest appliance that you are going to sit on the top of the trolley.
- Remove all drawers (bar the bottom one), and their runners. (These will not be reused for this project, but if you like the look of them they could be retained, possibly, for up-cycled shelves?)
Gently remove the top of the Tallboy and any internal framework that was attaching it to/supporting it on the cabinet- take care with this as you will be refitting it back on top of your resized Tallboy. - Carefully measure, FROM THE BASE of the Tallboy, the height that you need the finished trolley to be, less the height of the castors and the wooden too that you just removed. This will leave the amount that you need to remove from the height of the cabinet.
i.e. If your Tallboy top is 20mm deep, and your castors are 50mm high (total 70mm) and you want finished trolley to be 800mm high, you measure 730mm up from the base and that is how high you want the cabinet to be- because, 730mm + 20mm + 50mm= 800mm. - Using a square or a level, rule all the way around the cabinet and then with a handsaw or jigsaw or other suitable cutting tool, remove the excess.
If needed, lightly sand the edges to remove any splinters of wood.
Reattach the top (using the same framework that you removed along with the top previously) and using some of the screws from the runners that you removed earlier, fix the bottom drawer in place. - Stand cabinet upside down on a clean flat surface for the next couple of steps...
Using a hole saw (big enough for double the width of the widest part of the plug on the appliances that you want to sit on top of your trolley) cut a hole in the top, centre of the back panel of the cabinet.
Mount your power box or power board inside the cabinet and run the cord out of the hole that you just drilled out (nail clip the cord around the inside walls of the cabinet so that it doesn't dangle loosely).
Screw the cup hook into the back of the cabinet, near to where the cord comes out of the hole (when the trolley is finished, you will coil up the excess cord length and hang it on the hook, ready to use).
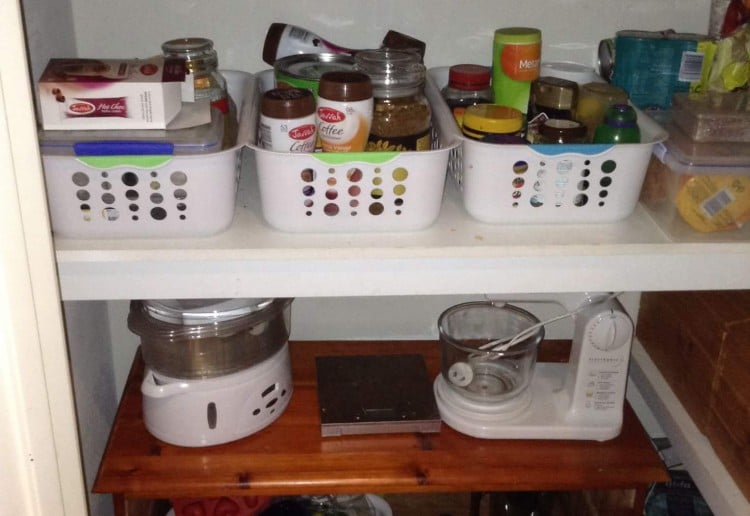
Attach the castors to each of the four corners of the base of the cabinet (If you have a very long or very heavy Tallboy, you may want to also use two castors in the middle of the cabinet base). - Turn your trolley back over onto its castors and you are ready to stock it!
I keep my Sunbeam Mixmaster, electronic scales and Vege Steamer on the top of mine (run the cords over the back of the trolley , through the hole and plug into your power box.
I have stored all of my baking 'stuff' cutters/measures/rolling pins/piping bags/scales etc, as well as my Slender Blender and mini chopper, beater mix and all of the various beater attachments (dough hooks etc etc). - The BEST part about this project is that you don't have to sand/prep/stain/second coat stain etc etc etc
You're basically working with a finished product and ours was finished within a couple of hours... And, since it was finished (3 days ago), I've used it about 5 times- that means 5 times less squatting or bending down to get my HEAVY mixmaster from the back of the only cupboard that I could fit it in to... YAY!!
Want other brilliant projects sent to you?
You might also like…


This project was posted by:


8:15 am
12:05 pm
-

-
-
-
mggarner replied
- 10 Aug 2018 , 11:31 pm
Reply1:17 pm
-

-
-
-
kjgarner replied
- 26 Jun 2018 , 10:36 am
Reply5:13 pm
7:37 am
7:29 pm
3:29 pm
11:02 pm
1:52 pm
9:31 pm
7:01 pm
8:20 am
9:39 pm
5:55 am
7:45 pm
6:01 am
-

-
-
-
LaninChris replied
- 14 Jul 2016 , 10:36 am
Reply9:25 am
-

-
-
-
LaninChris replied
- 14 Jul 2016 , 10:31 am
Reply10:29 am
-

-
-
-
LaninChris replied
- 14 Jul 2016 , 10:27 am
Reply2:15 pm
-

-
-
-
LaninChris replied
- 14 Jul 2016 , 10:24 am
Reply5:25 am
-

-
-
-
LaninChris replied
- 14 Jul 2016 , 10:04 am
Reply- «
- 1
- 2
- 3
- »
Post a commentTo post a review/comment please join us or login so we can allocate your points.