


Introducing the team that will bring you Jamie Oliver HomeCooker Reviews.
Recently we had hundreds of mums apply to take part in the Jamie Oliver HomeCooker reviews. The gallery of mums in their kitchens was fantastic to spend time browsing through! From all the mums who entered the team at Philips have chosen the 20 mums they would like to conduct the Jamie Oliver HomeCooker reviews.
Each mum that has been selected to review receive a Jamie Oliver HomeCooker worth $529.95, a HomeCooker cookbook especially developed by Jamie Oliver and a $150 shopping voucher so that they can cook up a storm for a group of friends. In addition to this, 5 mums will also star in their very own video review of the HomeCooker!
Follow the MoM Review Team as they share their Jamie Oliver HomeCooker reviews.
The 20 mums that will conduct the Jamie Oliver HomeCooker reviews appear in the Gallery below – you can hover over their image to find out their name and the number of children they have.
Or, to see what they cooked, what they thought and how they rated the Jamie Oliver HomeCooker, simply click on their photo to visit their individual review page. There you’ll find reviews, recipes and photos of the Jamie Oliver HomeCooker in action as well as recipes each mum is whipping up.
WATCH VIDEO REVIEWS OF THE JAMIE OLIVER HOMECOOKER


READ REVIEWS OF THE JAMIE OLIVER HOMECOOKER


| Average Ratings (from 164 ratings) | |
|---|---|
| Would you recommend to other mums? | |
| Versatile & suitable for lots of recipes | |
| Saves time & makes my life easier | |
| Simple to understand & easy to use | |
Introducing the Jamie Oliver Home Cooker by Philips
Co-created by Philips and Jamie Oliver, the Philips HomeCooker is a first-of-its-kind, multi-functional device that does the preparation as well as the cooking!
The Philips HomeCooker performs multiple cooking functions, even stirring automatically thanks to its unique stirring arm. You can control the heat, set timers and know your food will never stick or burn. A revolution in home cooking, HomeCooker does all the hard work – so you don’t have to.
The Philips HomeCooker comes with an exclusive cookbook of delicious recipes developed especially by Jamie Oliver for the HomeCooker to help you create a great variety of dishes.
The Philips HomeCooker with Cutting tower HR1050/90 and HR1051/30 …
- Stirs for you
- Multiple cooking activities – chops, stirs, melts, simmers, stews, boils, steams, fries and sautés
- Includes Cutting tower with five disc system for shredding (x 2 sizes), slicing (x 2 sizes) and cutting julienne
- Includes steam basket, steam tray and pasta insert
- Auto shut off
- Intuitive control panel
- Temperature range of 40 – 250⁰ C
- 3 litre family sized stainless steel bowl
- Dishwasher safe for easy cleaning
- Available in black (HR1050/90) or white (HR1051/30)
The Philips HomeCooker, the first product in the Philips Jamie Oliver kitchen range, will be available from leading electrical retailers and department stores in Australia from November 2012.
- Philips HomeCooker with Cutting tower
- Philips HomeCooker
For more information and inspiration to create delicious HomeCooker recipes please visit www.philips.com.au/homecooker

See the Jamie Oliver HomeCooker in action …
https://www.youtube.com/watch?v=2veu6TvRqac
Published 11th November 2012


8:01 pm
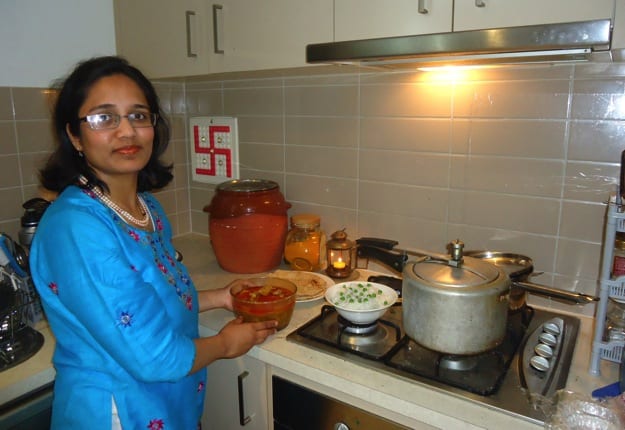
Creamy Pasta Sauce
Usually cooking a pasta sauce that involves fresh cream requires constant stirring to prevent the cream from sticking to the bottom of the pan as well as prevent it from separating.
The stirring arm played a good part in this recipe.
First it browned the chicken well without sticking and burning. While it was doing this I had time to sit with my kids and look at their homework. i had set the time to 20 minutes and the machine beeped when the time was up. Secondly when I added the freah cream cheese to my pasta sauce the stirring arm helped to combine the sauce together into creamy goodness.
I tried out the steamer basket to steam pasta ravioli, this was a hit and miss as it required a lot of time to steam the ravioli then I had anticipated. I learnt that in order to cook pasta ii really neededtoboil it rathe than steam.
i learnt that food such as pasta reauires a lot of time so it is best to boil pasta using the pasta insert ove hot boilling wate in the homecooker.
The steamer basket worked perfectly fine to steam vegetables ove a hot simmering curry though..
I loved the results and would definately reccomend the homecooker to anyone.
I have uploaded a video of my cooking experience on youtube which you can view by copying andpasting the url below onto your browser.
Cheers
http://m.youtube.com/watch?v=_m9Y4BCNIfA
7:03 pm
Chicken Cacciatore with Garlic Mash
8:05 pm
Beef Goulash oooh la la!!!!
Recipe was very easy to follow. The best thing was coming home knowing dinner was done. The vote from the contented family was 5 stars for the recipe (no leftovers). The process of cooking was very simple! Its time to clean the pan & cook the beetroots for salads this week :)
12:15 pm
No more creamed rice in a can
Jamie's recipe is delicious! Very creamy & full of flavour! I did add a little extra sugar as I wanted sweet rice. Topped it with a little drizzle of maple syrup. I had never used vanilla beans so was excited to taste & see how much they flavoured the rice. Never will I buy creamed rice again. I will be using the HC for this.
4:35 pm
Mastered!
Have been using the HC to make our Japanese curry. Its so easy now as I'm not constantly running back to stir the sauce & ingredients. No more sticking to the base of the saucepan because I've forgotten to stir. Love that I have a "little helper".
9:34 pm
Spaghetti
Our sauce just didn't turn out as rich & full of flavour as I would've liked. Not sure why - I did however use Pork mince for the first time ever. Normally only ever use beef mince but someone told me to try the pork. Thats OK - I'll just use my favourite recipe in future. Teenager 1 has enough sauce for Wednesday school lunch!
4:25 pm
Is it dinner time yet???
8:21 pm
Perfect Risotto
The Home Cooker along with Jamie's recipe made life so much simpler. The stirring arm of the Home Cooker fascinates my family (&me). Its quite mesmerising watching it.
Tonight I spent a bit more time, probably because i was quite nervous tackling a risotto. I did use quite a few extra pieces - saucepan, baking dish & fry pan. I didn't mind as we have a rule in our house - if you cook you don't clean up! So I just sat back while the family cleaned.
The thing I love the most is the cutting tower which I used for the onions, celery & cheese. The celery was a little awkward but I quickly worked out the best way to grate it. It makes less mess with no more little pieces flying around the kitchen (this is usually the kids job). Love the design of the cutting tower, fitting nice & snug against the pan.
Great recipe! Look forward to making this one again.
6:38 pm
Broad Bean & Asparagus Risotto & Chorizo Sausage
Tonight was the Broad Bean & Asparagus Risotto (didn't have the peas so just deleted them). Very simple & easy recipe to follow. I was feeling confident as had used the Home Cooker to create a previous Risotto. Last time I nervously watched & hoped it was going to work. Tonight I just followed the recipe and walked away confidently. The Chorizo Sausage was for teenager No 1 who is not quite sure about the "risotto" meal. I thought if I added the chopped sausage it would appeal to him more. But still had no success in winning him over. Teenager No 2 however enjoyed it thoroughly - which is surprising as he is normally the fussy one. Husband loved the whole minty, zesty lemon flavour.
Have found the clean up to be easy as have had plenty of "spare" time during the cooking phase to clean up before dinner, just leaving the pan to clean.
Have found a recipe for some steamed ginger cakes so am thinking I might try that tomorrow night when teenagers are at work :).
9:54 pm
Being brave - Chilli Garlic Chicken & Chorizo Sausage
12:02 am
I took the Jamie Oliver cooker away for the weekend
10:15 pm
Love the chopping tower and free time during cooking
I then used the chopping tower to chop the veges for my vegetarian nachos - very simple and easy to use although I do hold the pan up to the spout.
I often use it to julienne carrots for tacos or for a salad it's so easy to use and quick to clean. Worth holding the bowl up for.
In short I love my cooker and chopping tower. I think it will get more use in winter when the lovely flavours of the dishes create beautiful warming, tasty meals. The chopping tower I'll use all year around.
The only thing I haven't used at all yet is the steamer basket and pasta basket, maybe I haven't found the right recipes.
10:18 pm
Philips Recipe: Leek and Potato Soup with Prawns
The recipe required both the HomeCooker and the Cutting Tower. The Cutting Tower made very quick work of thinly slicing the leek, potato and onion required for the recipe. The cutting blade quickly clicked into place, but once again I had a little trouble removing it once I was finished. I’m sure there is a knack to exactly how to click it out easily, but I haven’t discovered it yet. The unit was very quick to use and clean however, so I’m more than willing to persevere.
The soup took almost no effort at all from me thanks to the stirring arm and Cutting Tower. Shelling the green king prawns was the most time consuming stage, and I was able to do that while the potato, leek and onion were simmering in the vegetable stock. The prawns cooked in the steamer tray while the soup simmered for a final 20 minutes and everyone came back for seconds, so we’ve got another tasty recipe to add to our list of family favourites.
I’m a little embarrassed to say that I’ve never cooked green prawns before, always having purchasing pre-cooked prawns in the past. It was so easy to steam the prawns over the simmering soup, I’m looking forward to using the HomeCooker to prepare garlic prawns and prawn laksa soon.
11:13 pm
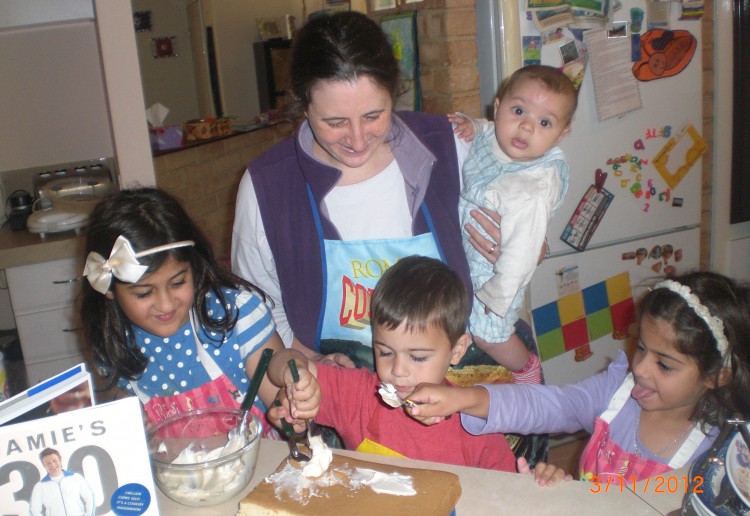
Philips Recipe: Sweet Dumplings
Making the dough was easy but a little time consuming as I had to keep returning to knead the dough and make sure that it was kept warm on the unseasonably cold day today. Next time (and there will definitely be a next time), I will probably use my breadmaker for the dough as it is easy to maintain the correct temperature for the dough to rise properly.
The recipe used ‘plum butter’ as the filling for the dumplings, although no recipe for this was provided with the dumpling recipe. I substituted some thick, homestyle jams purchased at the supermarket instead, using a couple of tablespoons each of apricot and plum jams.
Once the dumplings were prepared, it was easy to set the steamer basket up in the HomeCooker to steam them. The basket easily held five large dumplings. I only used one layer rather than using the second steamer tray, choosing to cook the dumplings in two batches instead. As always, set up and clean up of the HomeCooker was too easy. This is the first time we’ve used the steamer trays, but I’m planning to make pork dumplings later this week and I’m looking forward to being able to steam more dumplings in each batch than I could in the steamer I usually use thanks to the large double steamer trays.
The kids loved the dumplings for afternoon tea and my husband enjoyed them for supper this evening. Suggestions have been made for future filling flavours including lemon butter, strawberry jam, Nutella and chocolate. The recipe said that the dough would make 6 – 7 dumplings. I made it into 10, but I would probably make the dumplings even smaller next time, probably getting at least 15 – 20 small dumplings from the mix.
Another delicious recipe that I know we will use frequently. It will be great to make for lunchboxes or picnics and will be another reason to keep the HomeCooker on the kitchen bench within easy reach.
8:01 pm
Creamy Pasta Sauce
Usually cooking a pasta sauce that involves fresh cream requires constant stirring to prevent the cream from sticking to the bottom of the pan as well as prevent it from separating.
The stirring arm played a good part in this recipe.
First it browned the chicken well without sticking and burning. While it was doing this I had time to sit with my kids and look at their homework. i had set the time to 20 minutes and the machine beeped when the time was up. Secondly when I added the freah cream cheese to my pasta sauce the stirring arm helped to combine the sauce together into creamy goodness.
I tried out the steamer basket to steam pasta ravioli, this was a hit and miss as it required a lot of time to steam the ravioli then I had anticipated. I learnt that in order to cook pasta ii really neededtoboil it rathe than steam.
i learnt that food such as pasta reauires a lot of time so it is best to boil pasta using the pasta insert ove hot boilling wate in the homecooker.
The steamer basket worked perfectly fine to steam vegetables ove a hot simmering curry though..
I loved the results and would definately reccomend the homecooker to anyone.
I have uploaded a video of my cooking experience on youtube which you can view by copying andpasting the url below onto your browser.
Cheers
http://m.youtube.com/watch?v=_m9Y4BCNIfA
11:28 pm
A fantastic experience!
12:15 pm
No more creamed rice in a can
Jamie's recipe is delicious! Very creamy & full of flavour! I did add a little extra sugar as I wanted sweet rice. Topped it with a little drizzle of maple syrup. I had never used vanilla beans so was excited to taste & see how much they flavoured the rice. Never will I buy creamed rice again. I will be using the HC for this.
7:03 pm
Chicken Cacciatore with Garlic Mash
1:08 am
yummy chicken fahitas!
11:32 pm
another winning dinner!
9:30 pm
I thought the Jaimie Oliver Cooker would be good to make Jam
7:39 pm
Beetroot flavour, hard to beet!!
11:36 pm
HomeCooker made my dinner party stress free!
My menu was:
On arrival -
Cheese platter with Jamie Oliver's fiery pepper chutney
Entree-
Smoked salmon, Spanish onion, caper, avocado and lemon salad
Tomato, bocconcini and basil salad
Fennel and apple salad with maple prosciutto and salted caramel pecans
Main-
Butternut pumpkin risotto with crispy pancetta and sage
Dessert -
Raspberry semifreddo with star cookies
My philosophy with dinner parties is you need an entree and dessert that is prepared before your guests arrive and a main that can cook while you are eating your entrees. That being the case I would normally not serve risotto but with the HomeCooker I was able to put the risotto on while we were eating our entrees and just spend 10 minutes in the kitchen at the end of the entree finishing off the dish and plating up. That was pretty much the only time I spent in the kitchen for the whole dinner party so I was able to enjoy my friends' company instead of missing out while in the kitchen.
I also used the HomeCooker to make the pepper chutney the day before the party (a lot of work, not sure I would do it again. The chutney was nice but quite hot, not to everyone's taste) and to do a lot of preparation for the entrees before the party. The hit dish of the night was the apple and fennel salad. Here's the recipe:
12 slices prosciutto
1/4 cup maple syrup
1 cup pecans
1/2 cup caster sugar
1 teaspoon Sea salt flakes
1 tbsp water
2 bulbs fennel
3 red apples
2 tablespoons White balsamic vinegar
2 tablespoons Olive oil
Set HomeCooker to 175 degrees and once it has heated up add pecans, sugar, salt and water. Set timer for 12 minutes and cook pecans until sugar has dissolved and caramelised. Set aside.
Pre heat oven to 160 degrees. Brush prosciutto with maple syrup and place on baking paper on baking trays. Cook for 10 mins, until golden (watch so doesn't burn). Set aside.
Whisk together vinegar and olive oil. Set aside.
Use cutting tower to thinly slice fennel and apple. Combine with pecans and prosciutto and dress with dressing.
All in all a great night was had by all, even me as the host! I was so busy enjoying myself I forgot to take any pics of the food but here's a photo I took of the table before my guests arrived!
9:51 pm
something to go with the BBQ
1:03 am
Mmm...Chocolate Fondue! Keeping the entire family happy
It's been a busy time in our household lately, with family gatherings, trips away and end of year parties to attend. With so much going on I decided it was time to just sit down again with all the family and enjoy some meals cooked using the Jamie Oliver HomeCooker.
For the main meal I decided to use one of my popular recipes and cooked up a Tuna Mornay served with Fettuccine. For dessert, as a treat to the kids (big kids included!) I decided to serve up the much anticipated Chocolate Fondue (adapted from Jamie's Boozy Chocolate & Cherry Fondue).
Recipe: TUNA MORNAY with Fettuccine
60g Butter
2 medium onions
2 sticks celery
2 tablespoons plain flour
1 1/2 cups milk
1 cup cream
2/3 cup tasty cheese, grated (I used the Cutting Tower to grate mine!)
2 small cans of corn pieces, drained
2 large cans tuna, drained
1/2 cup breadcrumbs
Some extra grated cheese to sprinkle on the top before serving
Fettuccine - cook enough to cater for everyone's dinner and to have leftovers for lunch if you desire!
Set temperature to 130 degrees and melt butter, ensuring stirring attachment is in place. Add sliced celery and onion (using Cutting tower) and adjust the temperature to 175 degrees. Cook for approx 4 mins or until onion is soft. Add flour by sprinkling it evenly around the top of the mix and leave the HomeCooker to stir it into the mix for approx 1 minute or until mixture starts to bubble. Slowly add in combined milk and cream as the stirrer continues to mix the ingredients for you until it boils and thickens.
Add cheese, corn and tuna and let it stir until the cheese is melted.
Then you can either transfer the mix into an oven proof dish and cook in the oven with a sprinkle of breadcrumbs for 20-25 minutes. Alternatively, return the HomeCooker bowl to its element and set the timer for approximately 20 minutes. Then serve with Fettuccine and a sprinkle of cheese on top! (I cooked the mornay completely using the HomeCooker as I wanted to avoid making extra dishes and turning on the oven!)
The Tuna Mornay Fettuccine was very popular with the family but for the children the best was yet to come.
For dessert I used the HomeCooker to create a yummy chocolate fondue. I wanted it to be something for the children of the family to enjoy so I didn't worry about adding cherries or brandy to the mix but instead just used a mixture of cream and Cadbury Real Milk Chocolate Melts. I set the temperature to 130 degrees and added the chocolate first but soon realised that I needed to add the cream to help the HomeCooker to mix the chocolate easier. Once the cream was added I left the HomeCooker to do its thing while I cut up a range of different fruits, including strawberries, rockmelon, mango, banana and apple. I also had some marshmellows and white chocolate melts (my middle daughter only eats white chocolate) to serve alongside the chocolate sauce and fruit.
Once the chocolate and cream was all melted and blended nicely it was time for us to all enjoy it.
And enjoy it we DID! The kids are already nagging me to do this all again soon :)
9:48 am
Jamie Oliver cooked us lunch
Well my lunch yesterday with my friends was a huge success, all thanks to the Jamie Oliver Home Cooker!!! I hosted a Nutrimetics party for 12 mums (and 9 pre-schoolers), and planned to serve both Risottos from the cookbook as lunch. As I wanted to listen to the party host, I relied on Jamie to cook our lunch and beep at me, whilst I soaked my feet and tried on lotions and potions:) And it worked really well!
I actually made the Pumpkin risotto in the morning whilst getting the children ready for school, and just kept it in the fridge until lunch time. Roasting the pumpkin was so easy, and added a lot more flavour to the dish, as did adding the extra ingredients.
The Asparagus and pea risotto was even better. This is possibly the best tasting dish I have cooked so far, and so easy!! My friends were really impressed with the easy of the cutting tower, stirring arm and friendly beeper. I think I won a lot of them over!!
Comments included:
- Is that all you have to do, it stirs itself?
- This looks awesome Mel!
- Oh Yum!
- It is so easy to clean (from my gorgeous friend who took over washing my dishes)
I also think the best evidence of a great dish is the silence when eating, some friends going back for more, and the 12 empty plates!!
You have sold me on ease, versatilty and simplicity, and impressed my friends too!! Photo attached of some of my friends with the dishes (served in my fave Jamie Oliver bowls)
9:14 am
Practice Risotto was so easy
I was planning a big lunch with my friends to show off the HomeCooker, so thought I better have a practice run first with the Risotto. I attempted the Butternut Pumpkin recipe, but went shopping without looking at the recipe, so cooked it without celery, and the Pancetta and Sage toppings. As it was just a side dish, and I was lazy, I also didn't oast the pimpkin, just cut it up and threw it in just after adding the stock. In admitting all this, the Risottos was a breeze to make, and the rice tasted really nice....even reheated the next day for lunch!
It was a little bland, but that was probably because of the lack of ingredients etc. I was confident to host my lunch though:)
8:57 am
Success with Potatoes - Yipeeee
I have been using my HomeCooker every week, but been a bit frantic to update my reviews, so here are a few I have done recently.
Last weekend we cooked a roast, and I decided to attempt the potatoes again. I am so pleased to say they were a huge success!!! Crispy, scrumptious, and not mess on the bottom of the pan.
I used the proper waxy potatoes (instead of creamy ones) and didn't put the lid on the HomeCooker. If I had just read the recipe properly in the first place:)
I am o excited the potatoes worked out, and are so easy. Hosting Christmas for the first time this year for 26, we always seem to eat SO MANY potatoes, I am planning on cooking some in the oven, and other small ones in the HomeCooker to keep up with demand!!
11:07 pm
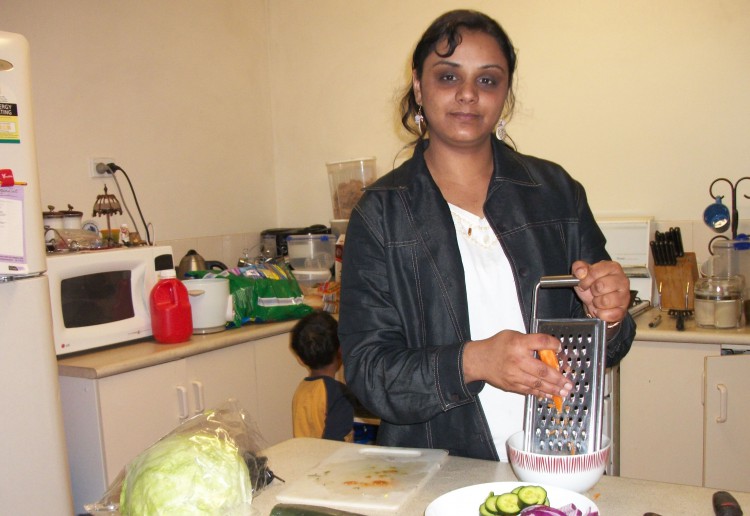
The cutting tower
I understand that it is an option to purchase and the Homecoojer can be ourchased with or without the chopping tower.
Its long tower design helps to chop and cook at the same time. I have been using it daily to chop onions and juliene vegetables while cooking in the homecooker. However you can also use the chopping tower on its own to chop salads or grate/shred vegetables to make chutneys.
It comes with 5 blades, with a variety of options to juliene,shred or chop. It also comes with a feeding chute which is designed just like a food processer, which is used to feed your vegetables inside the chopping/ rotating blades.
I am fairly satisfied with the performance of ithe chopping tower, and have given it a workout recently using to to shred carrots for making carrot cake,julliene vegetables for stirfrys,chopping cabbages and green apple to make coleslaw.
I was fairly satisfied with the consistency of the coleslaw, my son and his friends loved it when I served it with roast chicken recently at lunch.
The only drawback I have experienced so far is that the chopping tower has a tendency of catching pieces of vegetables beneath the blades but that can be easily taken care of by lifing the blade and scrapping all the vegetable out after you have finished chopping.
I have recorded a short video demonstrating the chopping onions in the chopping tower and frying them in the homecooker.
You can view it by clicking on the link below or copying and pasting the url on your browser.
http://m.youtube.com/watch?v=wU2rq9kBhZs
Cheers see you next time ladies.
4:53 pm
perfect toasted almonds!
- 1
- 2
- 3
- …
- 9
- »
Click here to post a reviewReviews on this page have now been disabled.
To register for reviews that are not open yet and for future reviews, enter your email below and we'll send you an email as soon as a review is open for application.