7 Comment
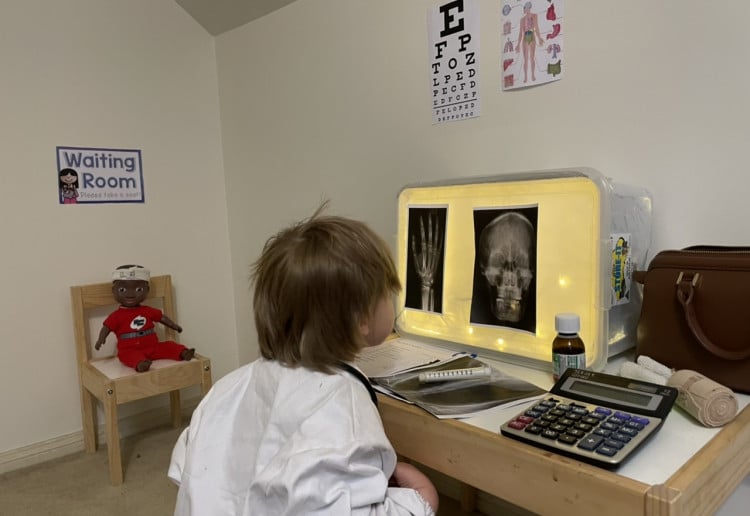
A fun, cheap and easy DIY x-ray lightbox reader for kids dramatic play. You probably already have everything you need lying around the house.
Material
- 1 Medium sized plastic storage tub with lid
- 1 Set of fairy lights
- 1 Roll Aluminium foil
- 1 Roll Baking paper
- Sticky tape
- Scissors
- Printed X-ray pictures
Method
- Line the whole interior of the plastic storage tub with aluminium foil (not the lid). Use sticky tape to attach it so it stays in place. The foil helps to reflect the light so you get a more even light coming through.
- Cut baking paper to size to fit the inside of the storage container lid. Attach with tape.
- Place the lights inside the box, ensuring that the cable and plug have been pulled out ready to plug in. I used a container with a lid that doesn’t fit too tightly on the tub so it doesn’t put pressure on the cord.
- Pop the lid on, turn it on its side and plug the cable in. You can use tape, blue tac or attach clips to the X-ray front to place the X-rays with. Print out your X-rays and enjoy!
Notes
I used x rays from this link: https://www.triedandtrueblog.com/childrens-play-x-rays/
I used normal copy paper because it’s what I had, but vellum paper or overhead transparencies would give an even better result.
Want other brilliant projects sent to you?
You might also like…
This project was posted by:
























-

-
-
meedee said
- 30 May 2024
-

-
-
RonnieDe said
- 04 Mar 2022
-

-
-
ashblonde said
- 30 Nov 2021
-

-
-
mom462038 said
- 10 Oct 2021
-

-
-
~Loui~ said
- 26 Sep 2021
-

-
-
Zmijka86 said
- 18 Sep 2021
-

-
-
Mrs.twinmama said
- 15 Sep 2021
Post a comment10:16 am
5:26 pm
11:21 pm
8:49 pm
10:12 pm
6:12 pm
12:33 pm
To post a review/comment please join us or login so we can allocate your points.