Hello!

81 Comment

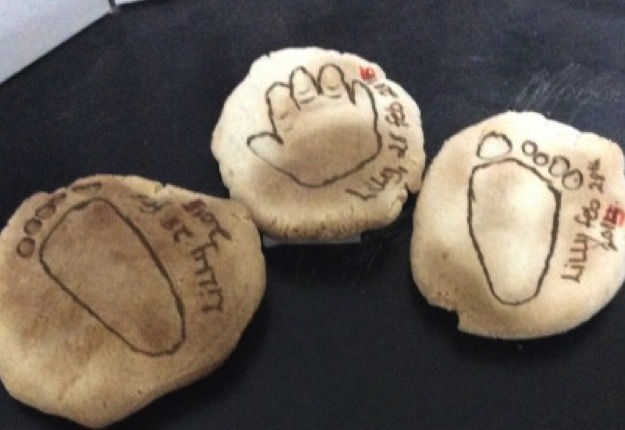
My first attempt turned out a bit funny but still make a great gift. I didn’t paint mine but outlined the foot and hand.


Material

  • 1 cup Salt
  • 1 cup Flour
  • 1/2 cup Water

Method

  1. First mix your flour, salt, and water together. Then knead really well until smooth. If it is too wet or sticky add more flour.
  2. Divide the dough into 2-4 pieces, depending on how many plaques you want to make. Just make sure they are big enough to put the child's foot/hand on. Squish them into round plaques about 1/2 inch thick.
  3. Now have your child make a foot or hand imprint. If it is not perfect, you can reshape the dough and try again!
  4. Using a pencil You can make a hole on the top so that ribbon can go through to hang it as an ornanment.
  5. Place the plaques on parchment paper and bake in the oven for 3 hours on low heat around 90 degrees C. You may need to adjust the time based on the thickness of your plaque.
  6. Once cooled.
    You can use an acrylic paint of your colour choice and have your child paint them.
    Just loop ribbon through the hole if you want to hang it up.


Want other brilliant projects sent to you?

You'll need to check this email to complete your signup.

Topics


This project was posted by:
  • Chelilly
    • 02 Jun 2015
      4:04 pm

Post your project
  • I was thinking about making salt dough. Thanks for the instructions.

    Reply

  • What a gorgeous milestone activity

    Reply

  • Great idea this one!

    Reply

  • What a fantastic idea. Fun for the kids and adults. Super easy and cost effective. Plus beautiful keepsakes. I was thinking of doing these yearly that way the kids can see the size difference in their hands and feet as they grow. Thank you luv.

    Reply

  • Great idea. We will enjoy this.

    Reply

  • You could do each year and make stepping stones for the garden


    • The kids will love having their artwork displayed in the garden

    Reply

  • Great so easy to do this. Kids will be happy to see their footprints later in life.

    Reply

  • I remember making these years ago before I had three kids. Might have to do one for the third I think I still have the others put away.

    Reply

  • I remember the kids making these in kindergarten. Great gift idea for mums, dads, nans and pops

    Reply

  • I love this idea! Would be incredible to see your hand or footprints, from a baby, when your an adult! I’ve seen these kits at the shops, that do the same thing, but they’re expensive! Your recipe is so inexpensive!

    Reply

  • A great way to remember when they were young!

    Reply

  • I love it. You could thread some string though the top and make them Xmas ornaments too.

    Reply

  • So nice for presents or just to keep. The kids will love to see how small they once were. Thanks.

    Reply

  • I was given a set of these for Mother’s Day from my baby grandson. They’re so sweet and a treasured keepsake

    Reply

  • That is such a special present without the enormous cost of getting it done professionally.

    Reply

  • I tried it but it turned out really thick and messy

    Reply

  • Such a great idea!! Thanks for sharing.

    Reply

  • Very cute and a fun way to show littles how much they have grown.

    Reply

  • Lovely keepsake…thanks for sharing this great idea ♥

    Reply

  • My first attempt turned out a bit funny but still make a great gift. I didn’t paint mine but outlined the foot and hand.

    Material

    1 cup Salt
    1 cup Flour
    1/2 cup Water
    Method

    First mix your flour, salt, and water together. Then knead really well until smooth. If it is too wet or sticky add more flour.
    Divide the dough into 2-4 pieces, depending on how many plaques you want to make. Just make sure they are big enough to put the child’s foot/hand on. Squish them into round plaques about 1/2 inch thick.
    Now have your child make a foot or hand imprint. If it is not perfect, you can reshape the dough and try again!
    Using a pencil You can make a hole on the top so that ribbon can go through to hang it as an ornanment.
    Place the plaques on parchment paper and bake in the oven for 3 hours on low heat around 90 degrees C. You may need to adjust the time based on the thickness of your plaque.
    Once cooled.
    You can use an acrylic paint of your colour choice and have your child paint them.
    Just loop ribbon through the hole if you want to hang it up.

    Reply

Post a comment

To post a review/comment please join us or login so we can allocate your points.

↥ Back to top

Thanks For Your Star Rating!

Would you like to add a written rating or just a star rating?

Write A Rating Just A Star Rating
Join