111 Comment
Do you remember the Shrinky Dink craze where you could get kits with the plastic printed with images which you coloured in, then shrank in the oven? Apparently, the women who came up with the idea of the kits found a craft in a magazine where you drew pictures or designs on plastic lids before shrinking them in the oven. You don’t have to buy the shrink plastic if you can find some #6 plastic!
Material
- 1 sheet shrink film (a.k.a shrinky dink plastic) or #6 plastic
- lots of permanent markers, in different colours
- 1 hole punch
- 1 baking tray
- 1 sheet baking paper
- 1 silicone baking mat
- 1 oven
- 1 chain
- some jump rings
- 1 clasp
Method
- Either buy some shrink film at a craft shop or look through your recycling for clear plastic marked with #6 - often sushi box lids are this type of plastic.
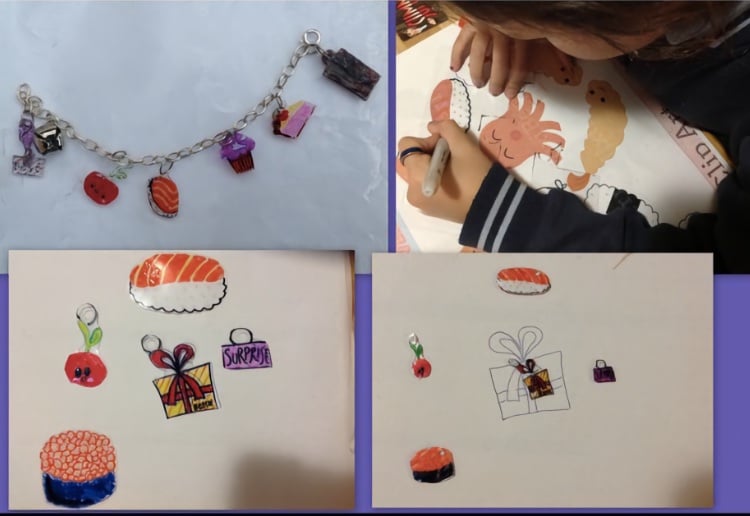
- Decide what charms you would like on your bracelet and draw the designs (or trace them) on the plastic. Colour the designs in and then cut them out, making sure there are no sharp corners. Keep in mind that colours will intensify with shrinking and each charm will be about a third of its original size.
- Punch holes in each piece of plastic, for attaching the charm to the bracelet.
- Place the charms on baking paper on the baking tray and cover with the silicone mat. The mat prevents the charms from curling over onto themselves and sticking together as they shrink.
- Place them in an 180C oven for 2 minutes. Leave to cool for a few minutes before lifting the mat, to ensure the charms are flat.
- Attach jump rings to each charm through the holes punched earlier. Attach the charms to the chain using the jump rings. Attach the clasp to one end of the chain.
Want other brilliant projects sent to you?
You might also like…
This project was posted by:
















8:37 am
1:49 pm
5:12 pm
8:27 pm
12:43 pm
10:45 pm
8:59 pm
5:32 pm
2:55 pm
10:24 am
10:45 pm
8:25 pm
7:29 pm
4:19 pm
5:16 pm
2:30 pm
-

-
-
kjgarner replied
- 22 Jun 2018 , 12:50 pm
Reply9:43 pm
3:54 pm
1:24 pm
10:33 pm
- 1
- 2
- …
- 6
- »
Post a commentTo post a review/comment please join us or login so we can allocate your points.