Thanks to Riot Art & Craft we have a fantastic DIY Owl trick or treat bucket tutorial you can do with your kids just in time for Halloween!
You will need:
- Stapler
- A3 Black Foam Sheet
- Gold Glitter Foam Sheet
- Purple Foam Sheet
- Scrapbook Card
- Gold Glitter Glue
- Gold Tinsel Stems
- Foam Glue
- Scissors
- Pencil
- 30cm Ruler
Step 1.
Cut a strip across your black foam, 14cm X 45cm. Roll it up and glue together. Put a staple at the top and bottom to hold in place.
Step 2.
Cut out a piece of the remaining foam, slightly larger than the diameter of your bucket. Trace the bottom of the bucket onto that foam, and then draw a generous line around it in foam glue. Cut a 2cm width strip from the purple foam and glue into position as a handle.
Place the bucket onto the glue, press firmly into position. You may wish to draw an extra line of glue around the inside of the bucket for extra reinforcement. Leave to dry completely and then trim the excess.
Step 3.
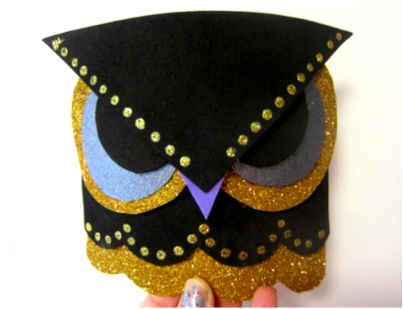
To make your owl, you will need the following shapes:
- 1 X triangle for the brow
- 1 X small purple triangle to slot underneath for the beak
- 2 X gold glitter circles
- 2 X grey circles
- 2 X black foam semi circles
- 2 X scalloped edge breast pieces.
Decorate with glitter glue (leave to dry), then assemble into position, and glue to the side of your bucket.
Step 4.
Make a name tag by writing your name in glitter glue on a piece of foam.
Step 5.
Add a ring made from a chenille stem, punch a hole in your name tag and hang off the handle.
We may get commissions for purchases made using links in this post. Learn more.











11:39 am
7:15 am
12:24 pm
2:43 pm
12:45 pm
9:57 am
3:12 am
10:29 pm
9:10 pm
8:29 pm
11:48 pm
2:01 am
6:24 pm
8:49 pm
9:13 pm
- 1
- 2
- …
- 8
- »
Post a comment